Q: Remote debugging is fine and dandy... but what about debugging my application locally?
A: For those who don't want to deal with the complexities of remote debugging, want the simplicity of having everything on a single machine and/or do not have a full copy of Visual Studio 2005 or 2008... then local debugging can be the way, however can also be problematic and limited.
Software Requirements
- Visual Studio (2005, 2008 or Express)
- Running copy of Windows Home Server
It is highly suggested that if you install a tool like Visual Studio to a Home Server, that you only do so to one running in Virtual PC in case something gets screwed up, leaving your running Home Server pristine and untouched except for testing near final versions of your add-in.
Installing Visual Studio (Express)
After downloading the Express Edition of your choice (C# or VB.NET is suggested), simply launch it and go through the setup process, accepting all defaults.
During the setup process the installer will download the necessary files, install them and let you know when it's all done and ask you to reboot (which you should accept).
Configuring Visual Studio
So as to make Visual Studio on our Home Server more integrated with the development experience, we should tell Visual Studio where to look for the common Home Server assemblies that your add-in will need to reference, to do so you'll want to add a registry key as noted in Dev Tip #6, or download and import this file into the registry on your Home Server.
Next, to make Visual Studio help you build a project from a template, you should download one of the Add-in Project Templates (C# Template, VB.NET Template) and copy it to one of the following locations (depending on the language and version of Visual Studio you will be using):
C:\Documents and Settings\Administrator\My Documents\Visual Studio 2008\Templates\ProjectTemplates\Visual Basic\
or
C:\Documents and Settings\Administrator\My Documents\Visual Studio 2008\Templates\ProjectTemplates\Visual C#\
Remember when using the project that due to the Visual Studio bug (2005, 2008) you will need to change the assembly name of the project.
Configuring Project (Express)
While the previous changes we've made affect the entire system, the next ones affect only the project that we'll be working with which means it is here you will want to create your new project (and save it) or open an existing one.
Your method of configuration will depend on the version of Visual Studio you are running... if you are running a non-Express version of Visual Studio, skip ahead to the next section... otherwise get ready for a little bit of project file hacking.
As discussed in Dev Tip #7, the Express Editions honor many configuration options in the Project files that they themselves do not provide a user interface to specify... two of those items we will need to set to copy the newly built add-in to the appropriate directory and launch the Home Server Console, to do so:
It is suggested that you back up your project file prior to following these steps in case a mistake is made.
- Open the your project file in a text editor(ProjectName.csproj or ProjectName.vbproj depending on the language)
- Modify the file to end with the following:
<Project DefaultTargets="Build" xmlns="http://schemas.microsoft.com/developer/msbuild/2003" ToolsVersion="3.5">
...
<PropertyGroup>
<PostBuildEvent>copy "$(TargetDir)\$(TargetName).*" "C:\Program Files\Windows Home Server\"</PostBuildEvent>
</PropertyGroup>
</Project>
- Close the project file
- Create a new text file named ProjectName.csproj.user or ProjectName.vbproj.user in the same directory as the previously edited project file
- Add the following contents to that file:
<Project xmlns="http://schemas.microsoft.com/developer/msbuild/2003">
<PropertyGroup Condition=" '$(Configuration)|$(Platform)' == 'Debug|AnyCPU' ">
<StartAction>Program</StartAction>
<StartProgram>C:\Program Files\Windows Home Server\HomeServerConsole.exe</StartProgram>
<StartWorkingDirectory>C:\Program Files\Windows Home Server\</StartWorkingDirectory>
</PropertyGroup>
<PropertyGroup Condition=" '$(Configuration)|$(Platform)' == 'Release|AnyCPU' ">
<StartAction>Program</StartAction>
<StartProgram>C:\Program Files\Windows Home Server\HomeServerConsole.exe</StartProgram>
<StartWorkingDirectory>C:\Program Files\Windows Home Server\</StartWorkingDirectory>
</PropertyGroup>
</Project
An alternative to steps 5 and 6 is that you can download this file, rename it as appropriate and place it next to the project file in question.
In the above steps, you have configured your project to copy the new add-in to the C:\Program Files\Windows Home Server\ directory, and then optionally launch the Home Server if you wish to debug your add-in in it.
Configuring Project (non-Express)
If you have installed a full copy of Visual Studio to your Home Server, after launching it and opening the project in question and...
- Right click on the project in Solution Explorer and select Properties
- Select Build Events tab
- Enter the following text into the Post-build event command line text box:
- copy "$(TargetDir)\$(TargetName).*" "C:\Program Files\Windows Home Server\"
- Select the Debug tab
- Check the Start external program and specify the following path:
- C:\Program Files\Windows Home Server\HomeServerConsole.exe
- Specify the following path for the Working directory:
- C:\Program Files\Windows Home Server\
- Exit settings
Now your Visual Studio is configured to automatically copy the updated build to the Home Server Directory and launch the Home Server Console to test it out when you choose.
Debugging
When it comes time to debug... simply pressing F5, selecting the Debug -> Start debugging or clicking the Start Debugging will rebuild the add-in and launch the Windows Home Server Console, allowing you many of the same debugging features that you are used to.
Unfortunately early into your debugging you will likely encounter an exception such as this one:
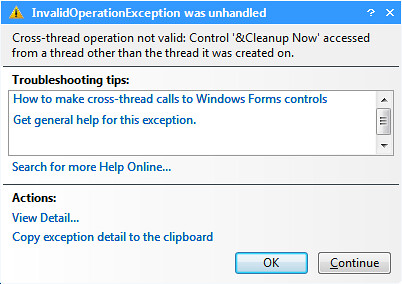
This is caused by the Home Server Console throwing an exception that it probably shouldn't.
Unfortunately here we hit a limitation the Express Editions which we can't so easily work around, while the non-Express versions Visual Studio allow you to attach to a running process at any time, Express only allows you to attach to the process when first launching it, nor does it allow for launching of the project (or some program that will use it's output) from the development environment without attaching the debugger as you can in the higher versions.
Hopefully some of the issues in the Home Server Console that keep it from being easily debuggable will be resolved in a later update or version.
In the mean time however this means that debugging and testing an add-in in a copy of Visual Studio Express that is running on a Windows Home Server is much more difficult than than if a higher version is used, however with some care these errors can be mitigated by slowly learning which operations you carry out raise an exception. The most common place I've seen it for instance is when entering Settings.
Alternative
At first glance, ones Settings page may seem impossible to test with the debugger because the exception is raised prior to your ever being able to display it. One alternative is to temporarily change the HomeServerTabExtender class to create an instance of your add-ins settings page control instead of the normal main tab, effectively changing something like this:
Private consoleServices As IConsoleServices
Private m_tabControl As MainTabUserControl
Public Sub New(ByVal width As Integer, ByVal height As Integer, ByVal consoleServices As IConsoleServices)
Me.m_tabControl = New MainTabUserControl()
Me.consoleServices = consoleServices
End Sub
to this:
Private consoleServices As IConsoleServices
Private m_tabControl As SettingsTabUserControl
Public Sub New(ByVal width As Integer, ByVal height As Integer, ByVal consoleServices As IConsoleServices)
Me.m_tabControl = New SettingsTabUserControl()
Me.consoleServices = consoleServices
End Sub
This then allows you to have the debugger attached when working with your settings page, just be sure to change it back before releasing your new add-in to the world.
Conclusion
Local debugging with Visual Studio is very possible, it is not recommended with Express due to its inability to attach to an existing running process and the Home Server Consoles propensity to raise InvalidOperationExceptions, leading to the requirement to be extraordinarily careful of what operations are carried out with the debugger attached, and rendering certain area's
Next Time
Next week I'll go into the FancyListView control which is used by most of the existing tabs to show a list of data with multiple attributes attached and show you how you can add status icons and even a progress bar in places you cannot easily do with a run-of-the-mill ListView control.
Note: The information in this post is based on undocumented and at times deduced information on Windows Home Server and is not officially supported or endorsed by Microsoft and could very easily be wrong or subject to change in future, so please take it and everything else said on this blog with a grain of salt and use with caution.
Read the complete post at http://feeds.feedburner.com/~r/IHateLinux/~3/198650582/whs-developer-tip-95-debugging-part-2.html